WIS2 in a box hands-on training
This procedure is mainly based on the wis2box-1.0b5. Please note that this procedure may differ from the latest version. Please refer to "Releases · wmo-im/wis2box (github.com)" for the latest version.
- Part 1. Obtaining data via WIS2 global services
- Part 2. Making JMA sample data available for WIS2 global services
- Part 3. Making data from your own country available for WIS2 global services
- Part 4. Reference information
Contents
- Part 1. Obtaining data via WIS2 global services
- Part 2. Making JMA sample data available for WIS2 global services
- Part 3. Making data from your own country available for WIS2 global services
- Part 4. Reference information
In this training, you will experience the world of WIS2 by building a WIS2 Node on your PC. WMO produces a product called WIS2 in a Box, or wis2box, as an implementation of a WIS2 Node. The training highlights two functions of wis2box. One involves obtaining data via WIS2 global services, including Global Broker and the Global Cache (covered in part 1 here). The other function involves making data available for WIS2 global services (covered in parts 2 and 3). You will use JMA sample data in part 2 and data from your own country in part 3.
It should be noted that wis2box is currently under development for official release. Actual procedures may change significantly from those detailed in this training, whose purpose is simply to provide a general introduction to the world of WIS2.
You will need to ensure an appropriate PC environment for wis2box in advance as described at:
https://docs.wis2box.wis.wmo.int/en/1.0b5/user/getting-started.html#getting-started
Part 1. Obtaining data via WIS2 global services
wis2box automatically obtains data via WIS2 global services. The WIS2 mechanism is detailed in this section.
As shown in Fig. 1-1, to obtain data via WIS2 global services:
- wis2box subscribes to Global Broker messages via MQTT protocol.
- wis2box receives MQTT messages with a data URL from Global Broker.
- wis2box extracts the URL from the message and downloads the data from the Global Cache via http(s) protocol.
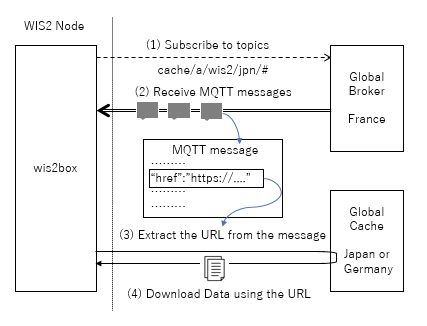
Fig. 1-1 Mechanism for data collection from WIS2 global services
Here in part 1, wis2box will be set up on your PC as shown in Fig. 1-1 to check that data can be downloaded. For Global Broker, data serviced by France are used; for the Global Cache, those serviced by Japan and Germany are used.
1-1. Subscribing to and observing MQTT messages in Global Broker
Before starting training for wis2box, subscribe to Global Broker messages and check MQTT message.
As shown in Fig. 1-2, the behavior of Global Broker is as follows:
- The user subscribes to topics via MQTT Client.
- The user automatically receives MQTT messages from Global Broker.
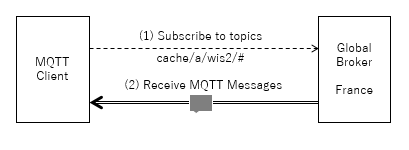
Fig. 1-2 The mechanism for MQTT message checking
Open a new console and enter the following:
Command 1-1
[Open new console]

$ docker run --rm eclipse-mosquitto mosquitto_sub -v -h globalbroker.meteo.fr -p 8883 -u everyone -P everyone -t 'cache/a/wis2/#'
Once this command is executed, messages akin to those below will be displayed. The part in curly brackets is the MQTT message.
cache/a/wis2/xxg/gts_to_wis2_dwd/data/core/I/N/C/X/37/EUMP {"id":"2711f99b-3c39-498b-8452-18ebeae8f23a","version":"v04","type":"Feature","geometry":null,"properties":{"data_id":"wis2/xxg/gts_to_wis2_dwd/data/core/I/N/C/X/37/EUMP/INCX37EUMP170701","metadata_id":"urn:x-wmo:md:int.wmo.wis::INCX37EUMP","gts":{"ttaaii":"INCX37","cccc":"EUMP"},"pubtime":"2023-11-17T07:46:21Z","integrity":{"method":"sha512","value":"0HmIlRhrmjrnQlpTYgT4dxl2rzp1MXDHAuovrVugvMm/1K5EkoQD6VqmHr8+z821MpQDVt4pz51NWL2oxAsDFA=="},"datetime":"2023-11-17T07:01:00Z"},"links":[{"href":"https://wis2-global-cache.s3.eu-west-2.amazonaws.com/A_INCX37EUMP170701_C_EDZW_20231117074430_03963701","rel":"canonical","type":"application/octet-stream","length":53781}]}
The mosquitto_sub command is used to collect MQTT messages from Global Broker in France.
FYI 1:
wis2box uses Docker as container technology to unify the application and its execution environment, thereby facilitating application deployment to a computer. Here, mosquitto_sub can be used with a single command as above without the need for time-consuming installation.
FYI 2:
mosquitto_sub is an application allowing the user to subscribe to messages with particular options:
-h The Global Broker: globalbroker.meteo.fr
-p Port number: 8883
-u Username to connect the Global Broker: everyone
-P Password: everyone
-t Subscribed topics: ‘cache/a/wis2/#’
-v With topic
Each time new data are stored in the Global Cache, you will receive an MQTT message containing the Global Cache URL.
To unsubscribe, hold down Control and press C.
1-2. Setting up wis2box
First, we’ll look at setting up wis2box from the WMO code repository on GitHub.
FYI:
Part 1 refers to the latest version of wis2box under development because the official release does not include a downloader.
To fix the settings for wis2box, enter the following:
Command 1-2
$ cd /home/devitm/Desktop
$ git clone https://github.com/wmo-im/wis2box
$ mv wis2box wis2box-download
$ cd wis2box-download
To set up some settings for the wis2box, enter the following commands:
Command 1-3
$ gedit wis2box-subscribe-download/local.yml
Once the above command is executed, the text editor will open. Update the settings as follows:
before
broker: mqtts://host:port
after
broker: mqtts://everyone:everyone@globalbroker.meteo.fr:8883
before
verify_data: true
after
verify_data: false
before
#validate_message: true
after
validate_message: false
before
- '#'
after
- 'cache/a/wis2/#'
Be sure to save this file.
Two wildcards can be used for topic setting. One is a hash symbol (#) covering multiple topic levels. This must be placed as the last character in the topic.
cache/a/wis2/#-> Data for all countries in the Global Cachecache/a/wis2/jpn/#-> Data for Japan in the Global Cache
The other is a plus symbol (+) covering single topic level.
+/a/wis2/jpn/#-> Data of Japan in the Global Cache or origincache/a/wis2/+/+/data/core/#-> Data for all countries in the Global Cache with data policy set to core
Note: To update to new topics for fresh data, wis2box must be rebuilt and rebooted to reflect this setting.
To create a directory for storage of downloaded data, enter the following:
Command 1-4
$ mkdir download
To set the storage location as the [P.1] configuration file, enter the following:
Command 1-5
$ gedit docker-compose.subscribe-download.yml
Once the above command is executed, the text editor will open. Update the settings as below.
before
- subscribe-download:/data/wis2box-subscribe-download
after
- /home/devitm/Desktop/wis2box-download/download:/data/wis2box-subscribe-download
Be sure to save this file and close the text editor.
1-3. Launching wis2box and checking downloaded data
Let’s launch wis2box. To build a container for the downloader, enter the following:
Command 1-6
$ cd /home/devitm/Desktop/wis2box-download
$ docker compose -f docker-compose.subscribe-download.yml build
This takes a few minutes to complete. Once you’re ready, launch wis2box and enter the following:
Command 1-7
$ docker compose -f docker-compose.subscribe-download.yml up -d
Make sure the data are stored in the download directory. When startup is finished, download will begin automatically. Open the wis2box download directory on your desktop. Wis2box automatically creates sub-directories as per the topic tree structure.
download
 └── wis2
   └── {contry code}
     └── {centre id}
       └── data
         └── core
           └── weather
             └── surface-based-observations
               └── synop
To count the files in the download directory, enter the following:
Command 1-8
$ find download -type f | wc -l
An increased number of files indicates successful automatic download to the directory from the Global Cache.
1-4. Stopping wis2box
To stop the process, enter the following:
Command 1-9
$ cd /home/devitm/Desktop/wis2box-download
$ docker compose -f docker-compose.subscribe-download.yml down
Part 2. Making JMA sample data available for WIS2 global services
wis2box automatically notifies Global Broker when data are placed in a specific directory, and provides the data to the Global Cache. In part 2, you will progress to a point where you can finally make JMA sample data available for WIS2 global services.
As shown in Fig. 2-1, the behavior of wis2box, which notifies of discovery metadata, is as follows:
- The user registers metadata to wis2box.
- wis2box provides MQTT messages with metadata to Global Broker via MQTT protocol.
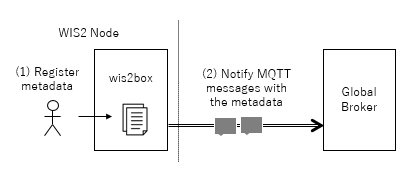
Fig. 2-1 Mechanism for metadata notification to Global Broker
Once registered, the data are ready for distribution.
FYI:
In actual WIS2 global services, the MQTT message is sent from Global Broker to the Global Discovery Catalogue after this procedure, and the metadata are registered on the Global Discovery Catalogue DB. The WMO Committee is discussing the distribution of only datasets registered here in the global service.
As shown in Fig. 2-2, the behavior of wis2box is as follows:
- The user inputs data to a specific directory. The data are ready to be downloaded from the Global Cache once they are in a public web area.
- wis2box parses the data and generates an MQTT message containing a URL for the new data.
- wis2box sends the MQTT message to Global Broker via MQTT protocol.
- Global Broker relays the message to the Global Cache via MQTT protocol.
- The Global Cache downloads the data using the URL in the message from wis2box via http(s) protocol.
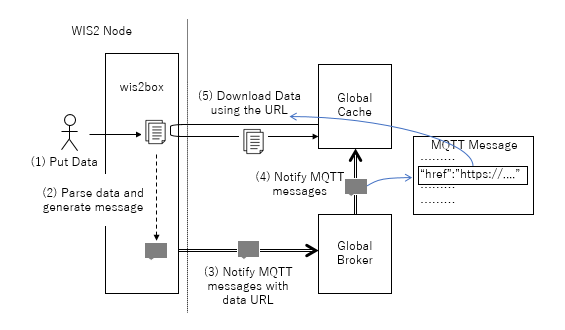
Fig. 2-2 Mechanism for data provision to global services
Parts 2 and 3 cover wis2box setup. As it is not possible to send messages to Global Broker in operation here, you will set up a dummy Global Broker on your PC for this training.
Part 2 will incorporate practice using existing JMA data, and part 3 will involve the same with data from your own country.
2-1. Setting up wis2box and metadata
2-1-1. Setting up wis2box
You will use the release package (1.0b5) provided by the WIS2 project on GitHub. To download wis2box, open a new console and enter the following:
Command 2-1
$ cd /home/devitm/Desktop
$ wget https://github.com/wmo-im/wis2box/releases/download/1.0b5/wis2box-setup-1.0b5.zip
To unzip the downloaded file and rename the directory, enter the following:
Command 2-2
$ unzip wis2box-setup-1.0b5.zip
$ mv wis2box-1.0b5 wis2box-upload
2-1-2. Creating configuration files
To create configuration files for wis2box, enter the following:
Command 2-3
$ cd wis2box-upload
$ python3 wis2box-create-config.py
Once the above command is executed, follow the prompts below.
Please enter the directory on the host where wis2box-configuration-files are to be stored:
-> /home/devitm/Desktop/wis2box-upload/data

Is this correct? (y/n/exit)
-> y

Please enter the URL of the wis2box:
-> http://localhost/

Is this correct? (y/n/exit)
-> y

Do you want to use a randomly generated password for WIS2BOX_STORAGE_PASSWORD (y/n/exit)
-> n

Please enter the password to be used for the WIS2BOX_STORAGE_PASSWORD (y/n/exit)
-> wis2boxpass

Is this correct? (y/n/exit)
-> y

Do you want to use a randomly generated password for WIS2BOX_BROKER_PASSWORD (y/n/exit)
-> y

Please enter your 3-letter ISO country code:
-> jpn

Please enter the centre-id for your wis2box:
-> jma

Is this correct? (y/n/exit)
-> y

Please enter the email address of the wis2box administrator:
-> useremail-address@example.com

Is this correct? (y/n/exit)
-> y

Please enter the name of your organization:
-> JMA

Is this correct? (y/n/exit)
-> y

Do you want to use this bounding box? (y/n/exit)
\-> y
2-1-3. Setting up station metadata
Next, station metadata need to be set up as outlined in part 3. In part 2, existing JMA station metadata will be used. To copy metadata files, enter the following:
Command 2-8
$ cd /home/devitm/Desktop/wis2box-upload
$ cp ../sample/station/jpn.csv data/metadata/station/station_list.csv
2-2. Launching wis2box
To launch wis2box, enter the following:
Command 2-9
$ cd /home/devitm/Desktop/wis2box-upload
$ python3 wis2box-ctl.py start
This takes a few minutes to complete. The following commands can be used to check startup status:
Command 2-10
$ python3 wis2box-ctl.py status
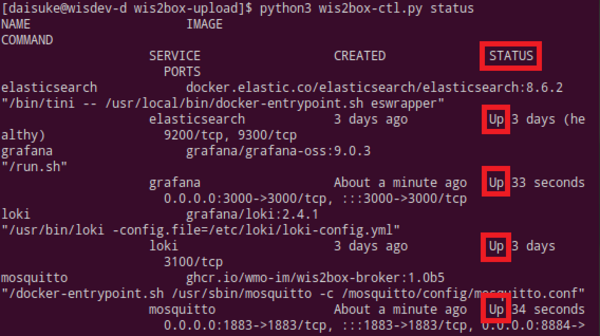
When all statuses are “Up,” the launch has succeeded.
2-3. Setting up a dummy Global Broker
As it is not possible to connect to the real Global Broker in this training, you will set up a dummy Global Broker on your PC as shown in Fig. 2-3.
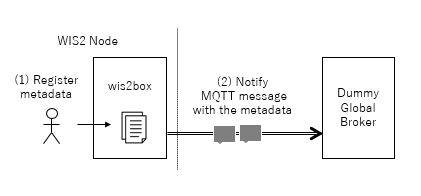
Fig. 2-3 Mechanism for metadata notification using a dummy Global Broker
To set up a dummy Global Broker, open a new console and enter the following:
Command 2-11
[Open new console]

$ docker run --rm eclipse-mosquitto mosquitto_sub -v -h 172.17.0.1 -p 1883 -u everyone -P everyone -t '#'
The dummy Global Broker will initially display nothing. Once metadata files are registered to wis2box, MQTT messages will be displayed on the console. Do not close this console until Part 2 of the training is complete.
2-4. Registering metadata
2-4-1. Registering discovery metadata
To register discovery metadata to wis2box, log in to the management container. Open a new console and enter the following:
Command 2-12
$ cd /home/devitm/Desktop/wis2box-upload
$ python3 wis2box-ctl.py login
Once the above command is executed, the prompt will change from $ to #. This indicates that you are logged in to the container.
Add SYNOP metadata to wis2box:
Command 2-13
# wis2box data add-collection /data/wis2box/metadata/discovery/metadata-synop.yml
# exit
Register the SYNOP metadata:
Command 2-14
# wis2box metadata discovery publish /data/wis2box/metadata/discovery/metadata-synop.yml
Submitted messages appear in the dummy Global Broker.
Also check the metadata registered to wis2box:
- Open http://localhost/oapi/ in a browser.
- Click ‘View the collections in this service’ under Collections.
- Click ‘Discovery metadata’ in the table.
- Under Browse, click ‘Browse through the items of “Discovery metadata”’.
- Click on ‘Hourly synoptic observations…’ in the table.
The registered SYNOP metadata will appear as shown in Fig. 2-4.
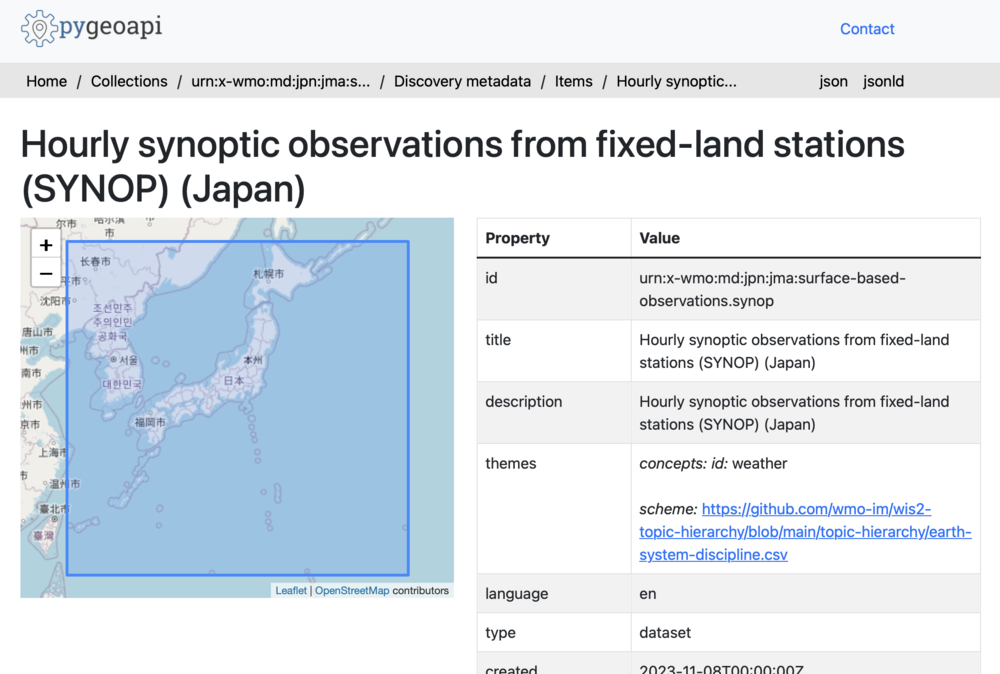
Fig. 2-4 Web image showing synoptic observation metadata
2-4-2. Registering station metadata
Register station metadata:
Command 2-15
# wis2box metadata station publish-collection
# exit
Check the metadata registration on wis2box.
- Open http://localhost/oapi/ in a browser.
- Click ‘View the collections in this service’ under Collections.
- Click ‘Stations’ in the table.
- Click on ‘Browse through the items of “Stations”’ under Browse.
- Click on a WIGOS-ID in the table.
The registered station metadata will appear as shown in Fig. 2-5.
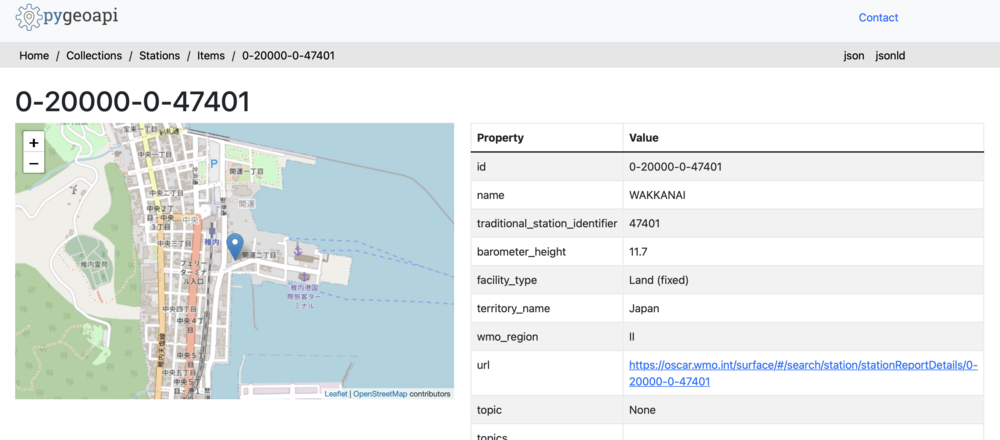
Fig. 2-5 Web image showing station metadata
2-5. Making JMA sample data available for global services
Once the metadata is registered, you can finally make data available as shown in Fig. 2-6.
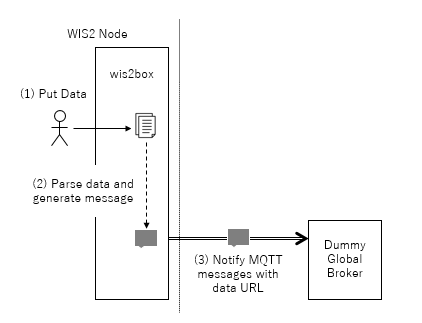
Fig. 2-6 Process of making data available
To input JMA sample SYNOP to wis2box, open a new console and enter the following:
Command 2-16
$ docker run --entrypoint=/bin/sh -it --rm -v /home/devitm/Desktop/sample:/sample minio/mc
FYI:
MinIO is adopted as part of wis2box. This is an application allowing storage and management of data as objects, and is used for distribution to the Global Cache in place of the Linux file system.
To set up an alias for the server, enter the following:
Command 2-17
# mc alias set wis2box http://172.17.0.1:9000 wis2box wis2boxpass
FYI:
The mc command operates MinIO.
To input data to MinIO, enter the following:
Command 2-18
# mc cp /sample/synop/jpn/A_ISMC01RJTD261200_C_RJTD_20231126122017_70.bufr wis2box/wis2box-incoming/jpn/jma/data/core/weather/surface-based-observations/synop/
# exit
Once the above command is executed, data can be input to MinIO, wis2box parses the data and sends a message to the dummy Global Broker, which should subsequently be checked.a
To check files are stored in MinIO, follow these steps:
- Open http://localhost:9000/ in a browser.
- Log in with ‘wis2box’ as the user name and ‘wis2boxpass’ as the password.
- Click the ‘wis2box-public’ browse button to see a list of storage files, and check that there are files for each location under the YYYY-MM-DD (date) directory.
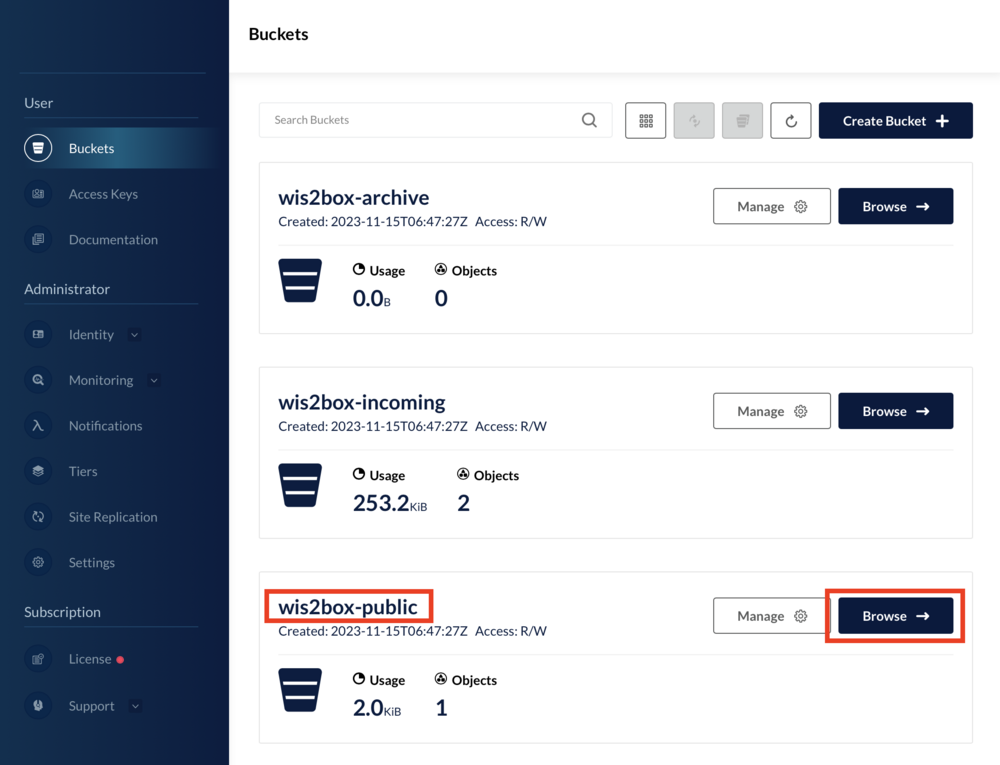
Fig. 2-7 Web image showing data stored in MinIO
wis2box can also display graphs showing the number of data within 24 hours for each station and the total number of data by time of day. Open http://localhost:3000/ in a browser.
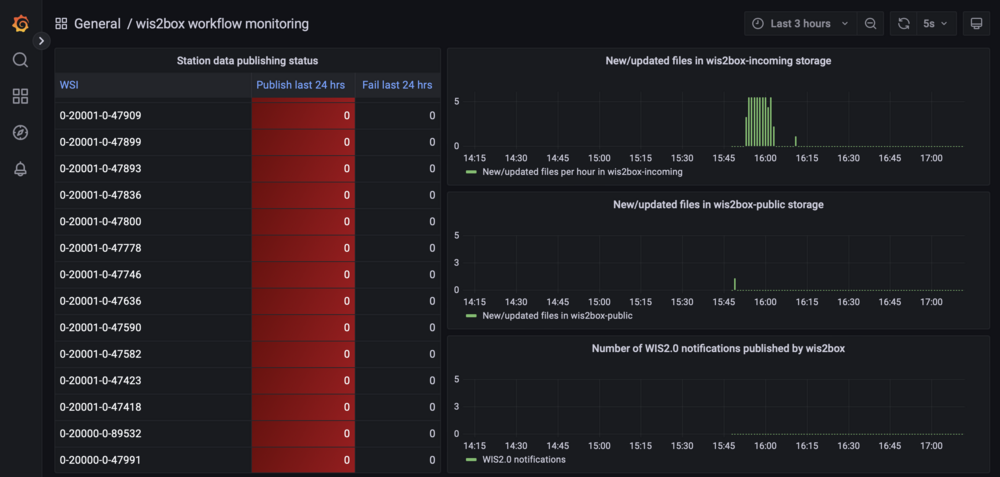
Fig. 2-9 Web image showing the total number of data
2-6. Stopping wis2box
To stop wis2box, enter the following:
Command 2-19
$ python3 wis2box-ctl.py stop
To delete data stored by wis2box, open a new console and enter the following:
Command 2-20
$ cd /home/devitm/Desktop/wis2box-upload
$ docker volume ls -q | xargs docker volume rm
Part 3. Making data from your own country available for WIS2 global services
Part 3 will involve practice using data from your own country.
To rename the directory so that you can build a new wis2box, enter the following:
Command 3-1
$ cd /home/devitm/Desktop
$ mv wis2box-upload wis2box-upload-jma
3-1. Setting up wis2box and metadata
3-1-1. Setting up wis2box
Follow the procedure outlined in 2-1-1, but enter your own country code instead of ‘jpn’.
Command 3-2
Please enter your 3-letter ISO country code:
-> {code in your own country}
See section 4-1 for individual country codes.
3-1-2. Setting up discovery metadata
As per 2-1-2.
3-1-3. Setting up station metadata
WIGOS-ID information is needed to set up metadata for stations. Retrieve an ID from the Oscar Web site using a browser. https://oscar.wmo.int/surface/
To generate station metadata using the tool in wis2box, open a new console and enter the following:
Command 3-3
$ cd /home/devitm/Desktop/wis2box-upload
$ python3 wis2box-ctl.py login
Once the above command is executed, log in to the container. To generate station metadata, enter the following command repeatedly for all stations:
Command 3-4
# wis2box metadata station get WIGOS-ID
Once the above command is executed, the process retrieves station metadata and aggregates related outputs to data/wis2box/metadata/station/station_list.csv. This process is time-consuming and will not be covered in this training. The metadata for each country should have been set in advance. Open a new console and enter the following:
Command 3-5
$ cd /home/devitm/Desktop/wis2box-upload
$ cp ../sample/station/XXX.csv data/metadata/station/station_list.csv
3-2. Launching the data publisher in wis2box
As per 2-2.
3-3. Setting up a dummy Global Broker
As per 2-3.
3-4. Registering metadata
As per 2-4.
3-5. Setting up real data from your own country
Real-time data from your own country can be downloaded from the GISC Tokyo site as outlined below. Find your data on the site and save the information using a browser:
https://www.wis-jma.go.jp/d/o/
To move data, enter the following:
Command 3-6
$ cd /home/devitm
$ mv Downloads/* Desktop/sample/synop/{your country code}/
3-6. Making data available
As per 2-6.
Part 4. Reference information
4-1. Country codes
| Country | 3-letter-code(ISO 3166-1) | Location indicator CCCC (WMO-No.9, Vol.C1 Annex I) |
|---|---|---|
| Philippines | phl | RPMM |
| Vietnam | vnm | VNNN |
| Thailand | tha | VTBB |
| Cambodia | khm | VDPP |
| Laos | lao | VLIV |
4-2. Reference links
- wis2box manual: https://docs.wis2box.wis.wmo.int/en/1.0b5/
- wis2box GitHub page: https://github.com/wmo-im/wis2box/